Once you have designed your study, you can share it with other users by assigning appropriate User Types and User Roles. These determine what each user can see and do within the Study Build System and study environments (Test and Production).
User Types
Each user is assigned a User Type and a User Role.
There are two User Types in OpenClinica:
| User Type | Description |
| Admin |
|
| User |
|
User Type defines global permissions—what tasks a user can perform across all studies. For example, only Admins can create studies or access the Administration page.
User Role determines study-level access and specific tasks the user can perform based on the assigned User Type in the Test or Production environments.
For example,
- A user might have User Type:Admin and User Role:Data Manager
- Another user might have User Type: User and User Role: Investigator
? Best Practice
The Admin User Type should be assigned sparingly because administrators have access to all studies. Most users should be assigned the User Type of User. Site users should never be assigned a User Type of Admin, as this would give them potential access to all data across all studies and sites in your Test and Production environments.
Each user can have only one User Type, but can hold different User Roles in different studies or sites.
Example: A user may have the User type, with the Data Manager role in one study and Study Monitor in another.
User Roles and Permissions
User Roles define what actions users can perform within a study or site.
ℹ️ Note: Site-level users can only see Participants at the sites they are assigned to. They cannot see study-level Participants. Study-level users can see all Participants.
Form-related permissions — such as viewing, entering, editing, clearing data, and managing queries — are configurable for each form via Form Access Settings (Read Only, Review, Edit).
? Legend✔ = Allowed ⚙️ = Configurable by Form Access — = Not Allowed |
Participants
| Study-Level Role | Site-Level Role | ||||||||||
| Action | Data Manager | Data Specialist | Data Entry | Monitor | Viewer | Data Manager | Investigator | CRC | Monitor | Viewer | |
| Add/ View | ✔ | ✔ | ✔ | ✔ | ✔ (View only) | ✔ | ✔ | ✔ | ✔ | ✔ (View only) | |
| Remove / Restore | ✔ | ✔ | ✔ | ✔ | — | ✔ | ✔ | ✔ | — | — | |
| Reassign | ✔ | — | — | — | — | ✔ | — | — | — | — | |
| Sign | — | ✔ | — | — | — | — | ✔ | — | — | — | |
Events
| Study-Level Role | Site-Level Role | ||||||||||
| Action | Data Manager | Data Specialist | Data Entry | Monitor | Viewer | Data Manager | Investigator | CRC | Monitor | Viewer | |
| Schedule / Add | ✔ | ✔ | ✔ | — | — | ✔ | ✔ | ✔ | — | — | |
| View | ✔ | ✔ | ✔ | ✔ | ✔ | ✔ | ✔ | ✔ | ✔ | ✔ | |
| Remove / Restore | ✔ | ✔ | ✔ | — | — | ✔ | ✔ | ✔ | — | — | |
| Lock | ✔ | — | — | — | — | ✔ | — | — | — | — | |
| Sign | ✔ | — | — | — | — | ✔ | — | — | — | ||
Forms
| Study-Level Role | Site-Level Role | ||||||||||
| Action | Data Manager | Data Specialist | Data Entry | Monitor | Viewer | Data Manager | Investigator | CRC | Monitor | Viewer | |
| View ⚙️ | ⚙️ | ⚙️ | ⚙️ | ⚙️ | default | ⚙️ | ⚙️ | ⚙️ | ⚙️ | default | |
| Review ⚙️ | ⚙️ | ⚙️ | ⚙️ | default | ⚙️ | ⚙️ | ⚙️ | ⚙️ | default | ⚙️ | |
| Enter / Edit ⚙️ | default | default | default | ⚙️ | ⚙️ | default | default | default | ⚙️ | ⚙️ | |
| Clear ⚙️ | default | default | default | ⚙️ | ⚙️ | default | default | default | ⚙️ | ⚙️ | |
| Remove / Restore | ✔ | ✔ | ✔ | — | — | ✔ | ✔ | ✔ | — | — | |
Queries
| Study-Level Role | Site-Level Role | ||||||||||
| Action | Data Manager | Data Specialist | Data Entry | Monitor | Viewer | Data Manager | Investigator | CRC | Monitor | Viewer | |
| Add | default | default | default | default | ⚙️ | default | default | default | default | ⚙️ | |
| Update | default | default | default | default | ⚙️ | default | default | default | default | ⚙️ | |
| Close | ✔ | — | — | ✔ | — | ✔ | — | — | ✔ | — | |
⚙️ Form actions depend on Form Access settings (Read Only, Review, or Edit). For more information, refer to Managing Form Access and Permissions.
Verification & Data Extract
| Study-Level Role | Site-Level Role | ||||||||||
| Action | Data Manager | Data Specialist | Data Entry | Monitor | Viewer | Data Manager | Investigator | CRC | Monitor | Viewer | |
| Verify / Unverify Forms (SDV) | ✔ | — | — | ✔ | — | ✔ | — | — | ✔ | — | |
| Extract Data | ✔ | ✔ | — | ✔ | — | ✔ | ✔ | — | ✔ | — | |
| Import Data | ✔ | ✔ | ✔ | — | — | ✔ | ✔ | ✔ | — | — | |
Study Management (when “Manage Study” is enabled)
Data Manager only can:
- Edit Study Settings
- Edit Study Design
- Publish Study
- Add Sites
- Invite Users
For more information on permissions available to each of the OC4 User Roles, refer to User Matrix (PDF).
Accessing the User Roles Screen
- From the My Studies screen, click the Settings icon on the Study Card.
- Select User Roles.
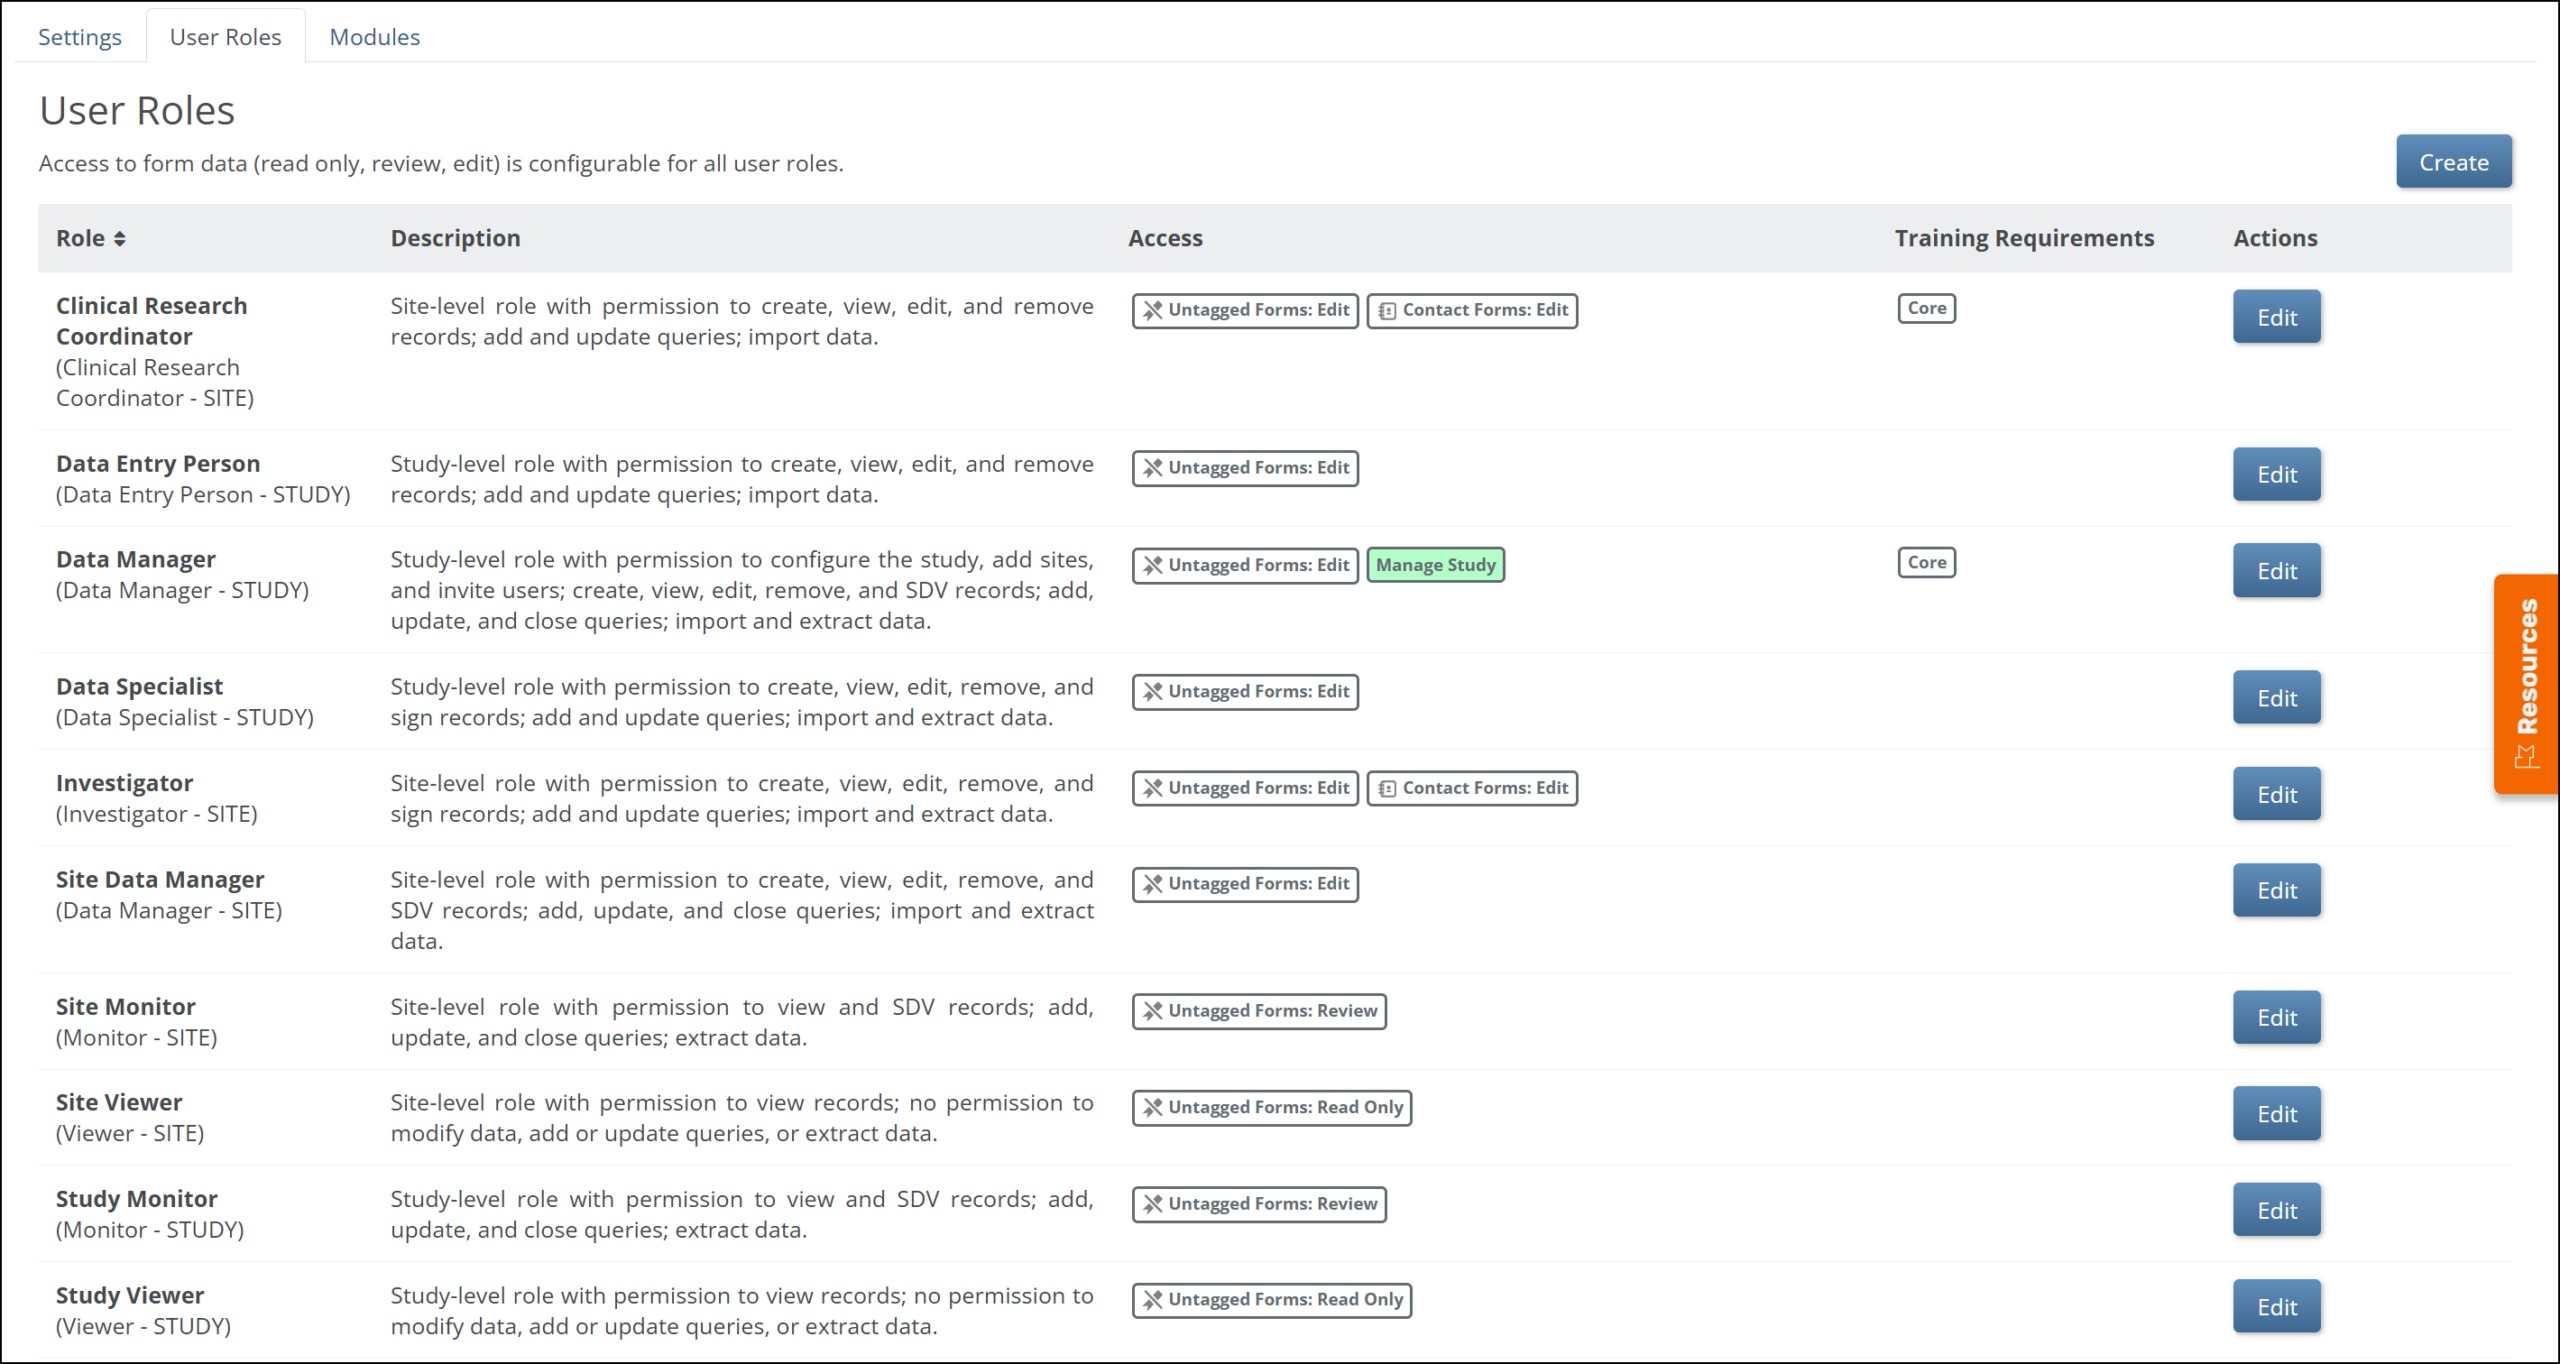
The Role column displays the name of the role in bold, and the role it was based in in parenthesis.
The Access column displays:
| Permission Type | Description | Permissions Included | Permission Description | Available For | Background Color |
| Form Access | Permissions that govern access to form data.
| Untagged | Forms that have not been configured with contact data or Manual Permission Tags. The default level of access is based on the role. | All users | white |
| Contact | Forms that include contact data fields. Roles based on CRC and Investigator users are granted Edit access and all other user roles have No Access by default. | ||||
| [Manual Permission Tags] | Forms that have been configured with a Manual Permission Tag in Study Designer. All Manual Permission Tags default to No Access. | ||||
| General | General Permissions can be selected or deselected as needed to grant or restrict access to OpenClinica features for the role being configured. | Manage Study | Grant access to Study Manager and Study Designer. All roles based on Data Manager will have this permission enabled by default. | Data Manager | bright green |
| Module-Specific | General Permissions can be selected or deselected as needed to grant or restrict access to OpenClinica features for the role being configured. | Show Reports Link | Selecting this tag gives users with this role the ability to view the Reports section of the Tasks menu (if Reporting and Analytics is active). Permission is disabled by default. ⚠️ Warning: If the Reporting and Analytics module is deactivated and later reactivated, previous Show Reports Link configurations are not automatically retained. | All users | blue |
| Permissions that govern access to the OpenClinica Code module. Only available if the module is active. | Coder Access | For information about Code permissions, refer to Code Activation and User Permissions | All users on studies using Code | White | |
| Reviewer Access | Light Green |
You can update these while creating or editing a user role.
Training Requirements Column
The Training Requirements column appears between the Access and Actions columns on the User Roles screen.
This column displays training requirements configured for the role.
- If Core Training Required is selected for the role, the column displays Core.
- If Core Training Required is not selected, the column remains blank.
You can update these while creating or editing a user role. For more information on Trainings, refer to LMS Integration LMS Integration.
Create a New User Role
- On the User Roles screen, click the Create button.
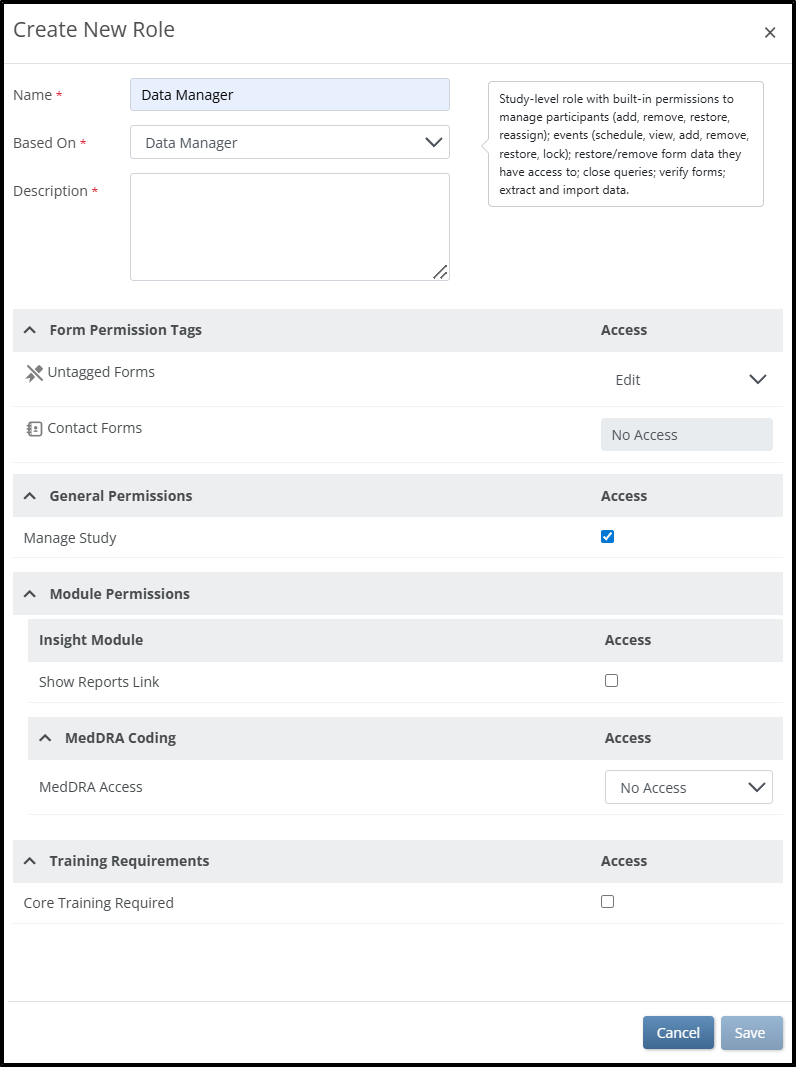
- In the Create New Rolewindow, complete the following fields:
- Enter a Name for the new User Role.
- Select a standard User Role to base the new User Role on. (The base User Role provides core permissions of the custom User Role.)
- Enter a description for the User Role. (The default User Role description appears to the right/below the User Role in the Based On field.)
- Assign Permissions as needed
- (Optional) Select the Core Training Required checkbox to require users assigned to this role to complete Core Training.
ℹ️ Note: If not selected, no training requirement is configured for the role.
- Click Save.
ℹ️ Note: Once saved, a User Role is available in both Test and Production environments for the current study.
Edit a User Role
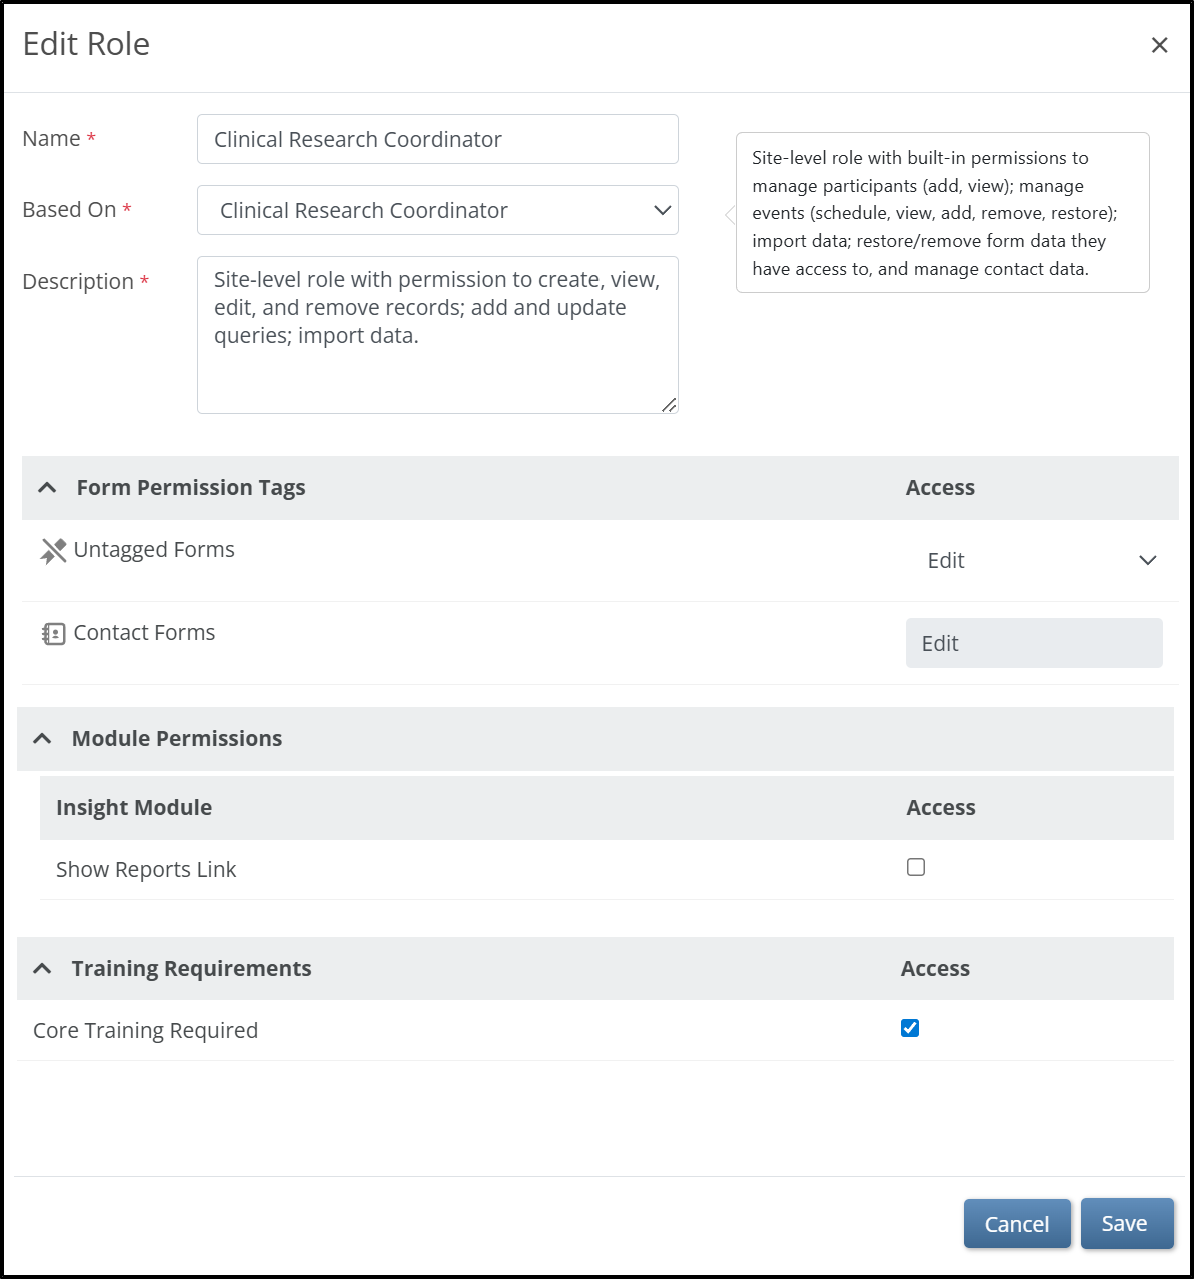
- On the User Roles screen, click the Edit button to the right of the role you want to edit.
- Update one or more of the following fields as needed:
- Name
- Based On
- Description
- Permissions
- Training Requirements
- Click Save.
ℹ️ Important Considerations
- User Roles are defined per study.
- Custom User Roles have the same access as the User Roles they were based on by default. Specific permissions can be updated as defined above.
- Both Base User Roles and Custom User Roles can be edited.
- Permission updates take effect immediately after saving; republishing the study is not required.
- Changes to roles assigned to users, user role definitions, and permissions assigned to user roles take effect for users based on whether they are logged in at the time of the change.
- Users not logged in will see updates upon their next login.
- For users who are logged in at the time the change was made, the change will be active in their session when they do any of the following:
- Clicking Go from Study Designer
- Accessing Change Study in Study Runner
- Navigate to any other Study Runner page (may not take effect for up to five minutes from when the change was saved)
- Log Out and Log In
- Permissions sections within the Create and Edit Role screens are collapsible.
- All roles roles default to Core Training Required unchecked.
- If you need a user to have access in one environment but not another, assign a different User Role in each environment.
For example,
A user may be assigned Clinical Research Coordinator 1 in the Test environment and Clinical Research Coordinator 2 in the Production environment.
In this setup, Clinical Research Coordinator 1 in Test environment might have access to a specific form, while Clinical Research Coordinator 2 in Production environment does not—depending on the permission tags applied to that form.
Was this article helpful?
That’s Great!
Thank you for your feedback
Sorry! We couldn't be helpful
Thank you for your feedback
Feedback sent
We appreciate your effort and will try to fix the article