Use Study Designer to create, configure, and manage Events and Forms for your study. These components define when data is collected and what information is captured for each participant.
Definitions
- Study Designer – The tool used to configure Events and Forms for your study.
- Event – A group of forms used to collect data during a specific point or activity in your study. Events may or may not correspond to real-world visits.
- Form or electronic Case Report Form (eCRF) – A structured collection of data fields used to capture participant information.
Examples
- An Event could represent a Follow-Up Visit or Early Termination.
- A Form might capture Vital Signs, Informed Consent, or Drug Accountability data.
Event Types
Each Event can be defined as one of the following:
Visit-Based Event 
An Event linked to the study protocol schedule. Each visit has a defined timepoint and set of forms.
Example: Week 2, Week 6, or Monthly Follow-Up.
Common Event 
An Event that can occur at any time in the study.
Example: Adverse Event (AE), Concomitant Medication (ConMed), or Early Termination.
Event Frequency
Both Visit-Based and Common Events can be configured as repeating or non-repeating.
Repeating Event 
Occurs multiple times, either a known or unknown number of times.
Example: Adverse Events or Concomitant Medications.
Non-Repeating Event
Occurs once per participant.
Example: Early Termination.
- You cannot change an Event from Visit-Based to Common (or vice versa).
- You cannot change an Event from Repeating to Non-Repeating.
- You can change a Non-Repeating Event to Repeating, but use caution — this may affect data collection and scheduling.
Calendar Configuration
Calendaring automates Event scheduling and notifications based on other Event statuses.
For more information on calendaring, refer to Basic Calendaring.
Manage Events
Use the Manage Events tools in Study Designer to add, edit, and configure Events in your study.
Add an Event
- Click +Add an Event.
- Enter a Name for the Event.
- Click the Event name to open its details.
- Complete the required fields.
- Click Save.
Edit an Event
- Click the Event Name to open the Event details.
- Update settings as needed.
- Click Save.
You can update the Event name directly in the name field.
- Changing the name updates how the Event appears in Study Runner.
- The Event OID (object identifier) does not change when the Event name is updated.
To edit the Event description:
- Click Edit next to the Description field.
- Add or update the description as needed.
- Click Save.
Copy an Event
- Click the Menu (⋮) next to the Event name.
- Select Copy.
Archive an Event
Archiving removes the Event and all associated Forms from the study. Archived Events can be restored at any time.
- Click the Menu (⋮) next to the Event name.
- Select Archive.
Restore an Event
- Click Archived Items in the header bar.
- Click Restore next to the Event you want to restore.
Collaborate
Use the Collaborate feature to view and manage team members involved in study design. You can assign collaborators to specific Events.
To manage collaborators:
- Click Collaborate in the Study Designer header.
- View all members with design access.
- Assign or remove collaborators from Events as needed.
Collaborators can comment directly on Events and Forms to streamline study design communication.
Members
Shows the users involved in designing the study who can be associated with specific Events.
Labels
Use Labels to visually group Events by color or text. Labels help organize Events but do not affect study behavior.
For more information on labels, refer to Design a Study-Labels.
Activity Log and Comments
The Activity Log tracks design actions related to Events, including:
- User
- Action performed
- Timestamp
You can also leave Comments to collaborate with other Study Designers.
For more information on activity log, refer to Design a Study-Activity Log.
Forms
Forms define the data collected during each Event.
You can create forms using either:
- Form Designer
- Form Template (XLS)
Form Designer
The Form Designer provides a drag-and-drop interface for building and editing forms.
- Click the Form Card.
- Click Design to open Form Designer.
For more information on form designer, refer to Using Form Designer.
Form Template
A pre-formatted spreadsheet (XLS) for defining form content.
Download the Form Template
- In Study Designer, click Form Template in the header.
- Save the XLS file locally.
Upload a Form Definition
- Click the Form name.
- Click Upload to upload your XLS Form.
- (Optional) Click Preview to test the form.
For more information on form template, refer to Using the Form Template.
Manage Forms
Preview a Form
Click Preview on the Form Card to test form logic, calculations, and conditional fields.
If the form is configured for eCOA, the button appears as Preview (as a Participant).
Search Library from a Form Card
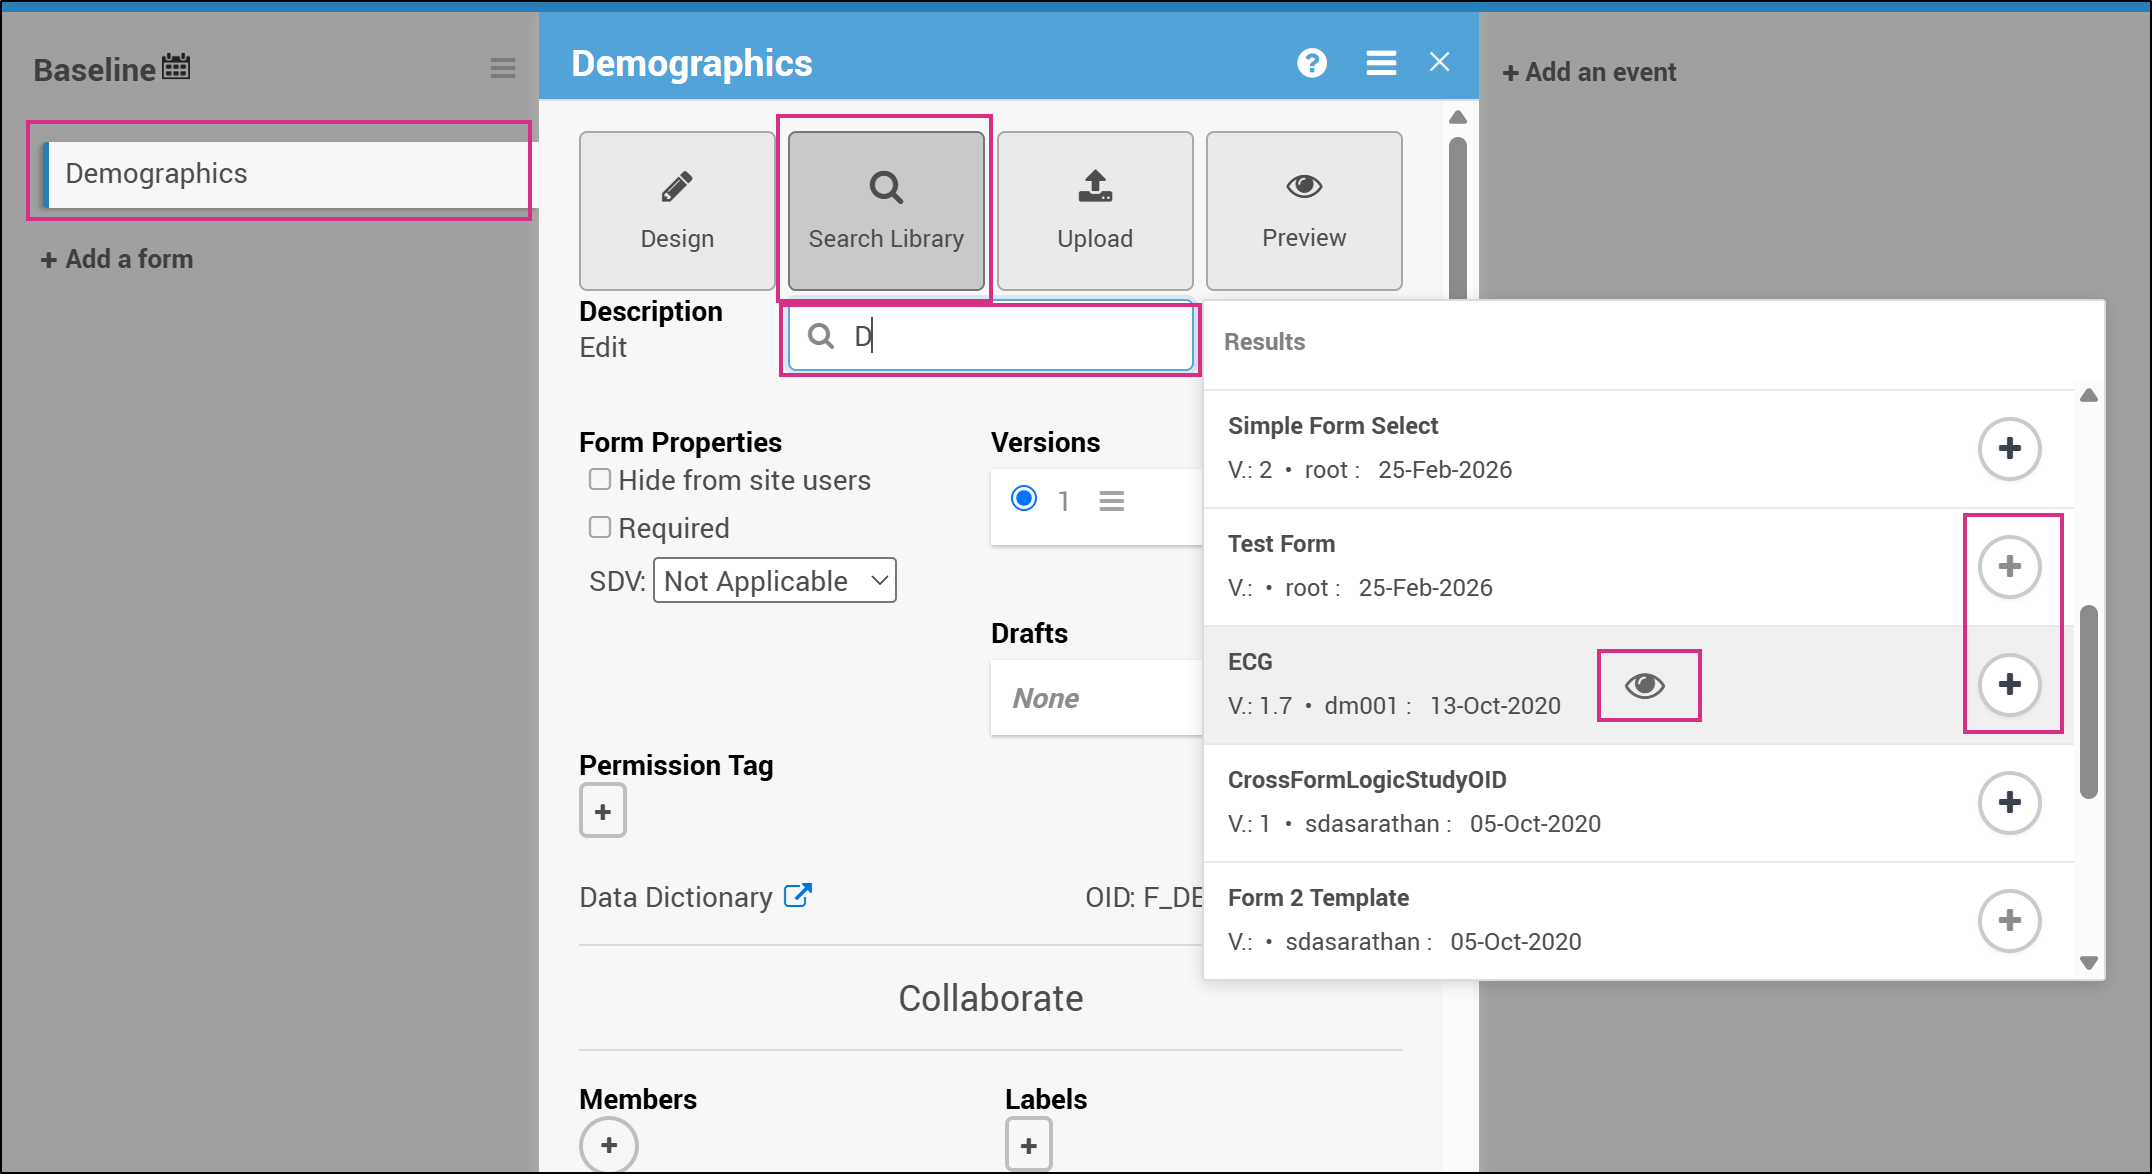
Each Form Card in Study Designer includes a Search Library button alongside Design, Upload, and Preview.
Clicking Search Library displays a search bar that allows you to search for form templates in the Content Library and add them directly to the form card.
The search field is automatically populated with the form card name.
Searches are case-insensitive and return results when the search term matches any of the following:
- Form name
- Owner
- Question labels
- Labels
Results are displayed in a scrollable list and load incrementally as you scroll.
To add a template from the Content Library:
- Click on the Form
- When the Form card opens, click Search Library.
- Enter the name of the template (or related keywords) in the search field to view matching results.
- Click + next to the template you want to add.
- The selected template is added to the Form card as a new form version.
Copy a Form to Another Event
- Click the Form name.
- Click the Menu (⋮).
- Select Copy To.
Add a Form to an Event
- Click + Add a form within the Event.
- Search for the desired form.
- Click + next to the form in the results.
You can add forms from:
- The current study
- The Form Library
Search for Forms from the Library
When you click + Add a form, a search field appears to locate forms stored in the Library.
As you type, matching Form Templates appear in a results panel.
The results panel includes:
- Results header
- Matching templates
If space is limited, the results panel may appear on either side or below the search field.
Clicking outside the search field or results panel closes the search interface.
For more information about the content library, refer to Using the Content Library.
Empty Search Results
If no matching templates are found, a message indicates that no templates match the search criteria.
Create a New Form from the Search Field
If a form does not exist in the results, you can add it as a new form.
Create the Form
- Enter the desired form name.
- Click the + button next to Add as a new form.
A new Form Card appears on the Study Designer board.
- If the entered name matches an existing form, the Add as a new form button is disabled.
- If the form name is not already in use in the study, the button to add a new form becomes available.
Form Metadata in Search Results
Search results display metadata under the form name:
- Form version
- Created by (username)
- Last modified date
The metadata appears in the following format:
V.: (version_number) · (username):(last_modified_date)
Example: V.: 2 · AnnabelLee:20-Mar-2025
Form Collections
If a template belongs to a Form Collection, the collection name appears as a badge in the search results.
If no collection exists, no badge appears.
Form Template Labels
Labels assigned in the Library also appear in the search results.
If no labels exist, none are displayed.
Template Version Requirement
If a template does not have a defined version in the Library:
- The + button is disabled.
- The tooltip displays: "Cannot add form without a version."
Preview a Form Template from Search Results
When you search for a form while adding a form to an Event, you can preview the template before adding it to your study.
Preview a Form Template
- In the search results list, click anywhere on the form row except the + button.
- A Form Preview overlay appears displaying the selected form template.
The preview displays the form layout and content using the same format as Form Designer Preview.
Close the Preview
- Click outside the preview window to close it, or click the X in the upper-right corner of the preview window.
- The overlay closes and returns you to the search results.
Forms from the Current Study
Forms already used in the study appear in search results with a label showing:
Study Name : Event Name
This helps identify where the form already exists.
Duplicate Form Restrictions
If a duplicate name exists:
- The + button is disabled.
- A tooltip indicates the form name is already in use.
Add a Current Study Form to Another Event
When adding a form from the same study:
- A copy of the Form Card is created.
- All versions are copied.
- Form properties must be configured separately.
Archive or Restore Forms and Form Versions
Use the Archive and Restore options to manage the availability of forms and form versions in your study.
Archiving a form removes it from its associated Event but keeps it available within the study. Archived forms are viewable but cannot be edited, and their data is excluded from extracts.
Archived forms appear in search results. They remain searchable even though they are not active on the board.
Archive a Form
- Click the Menu (⋮) next to the form name.
- Select Archive.
- Archiving a form removes it only from the selected Event. If the same form is used in multiple Events, those instances are unaffected.
- You must republish the study for archiving changes to take effect.
Restore a Form
- Click Archived Items in the header.
- Select Forms.
- Click Restore next to the form you want to restore.
Archive a Form Version
- Click the Form Name.
- Click the Version Options Menu (⋮) next to the version you want to archive.
- Select Archive.
- If the archived version is published (locked), it cannot be added or restored by selecting the Form Template.
- If the archived version is unpublished, selecting the Form Template restores the archived version and removes it from the Archived Items list.
Restore a Form Version
- Click Archived Items in the header.
- Select Forms.
- Click Restore next to the form version you want to restore.
Summary
| Action | Effect | Requires Republish? |
|---|---|---|
| Archive Form | Removes form from Event; keeps in study | ✅ Yes |
| Archive Form Version | Removes selected version only | ✅ Yes |
| Restore Form | Returns form to its Event | ✅ Yes |
| Restore Form Version | Returns version to active state | ✅ Yes |
Form Properties
Form properties can be edited on the form card.
| Icon | Property | Description | Example |
|---|---|---|---|
 | Hide from Site Users | Form is hidden at the site level but accessible at the study level. | Used for forms with imported data or review forms. |
 | Required | Must be completed for the Event to be marked complete. | Consent Form must be signed. |
| – | Allow Add Another | Enables multiple form entries in a repeating Event. | Multiple ConMed entries. |
 | eCOA Form | Allows participants to complete the form through OpenClinica eCOA. For more information, refer to OpenClinica eCOA. | Self-reported symptom diary. |
 | Public URL | Allows participant self-registration via a public link if OpenClinica eCOA is enabled. For more information, refer to Configure Forms for Offline Mode and Public URL. | Social media recruitment. |
 | Offline Capable | Enables offline data entry through eCOA. For more information, refer to Configure Forms for Offline Mode and Public URL. | Field research in remote areas. |
Source Data Verification (SDV)
Use Source Data Verification (SDV) to control which data items on a form must be verified against source documents. With Item-Level SDV, you can specify verification requirements for each individual item on a form.
When Item-Level SDV is enabled, each item on the form can be independently marked as Verified or Not Verified. If an item's data changes, only that item becomes unverified — other verified items remain unaffected.
Set SDV Requirements
- Open the Form Card.
- From the SDV dropdown, select Configure Item-Level SDV. The Form Card displays the Item-Level SDV icon
 .
. - Click Configure SDV.
- Define SDV requirements for each field using the following options:
- Not Applicable: items cannot be verified
- Optional: items can be verified
- Required: items must be verified for the form to be fully verified and get Verified status
- The Form Card displays the Item-Level SDV icon
 .
.
Validation Rule
If all items are set to Not Applicable, change the form's SDV Requirement to Not Applicable before publishing.
Form Drafts and Versions
Use Drafts and Versions to manage updates to your forms during study design. Drafts are unpublished, while Versions are finalized and published to Study Runner when you publish your study.
Overview
- Form Versions are the published, active forms included in your study.
- Form Drafts are editable forms created in Form Designer that are not yet part of a published study.
- Only Versions are pushed to Study Runner upon publication.
Upload and Manage Versions
When you upload a Form Template (XLS), the system automatically creates a Version that appears under Versions on the Form Card.
A Form Template must have at least one Version in the Library before it can be added to an Event. If no Version exists, the Form Template cannot be added to the Study Board.
You can upload new versions or overwrite existing ones:
- If the version number on the Form Template matches an existing version, the system overwrites that version upon upload.
- If the version number is different, the system creates a new version automatically.
Manage Drafts
When you create or edit a form in Form Designer and save it, it becomes a Draft. The most recent draft appears at the top of the list, labeled (latest).
Drafts:
- Do not create new versions
- Do not appear when you publish your study
- Do not appear in the Audit Log
Promote a Draft to a Version
To include a Draft in your published study:
- Click the Menu (⋮) next to the draft you want to promote.
- Select Add to Study.
This action converts the draft into a new version.
- In Form Designer: Change the version number in the Layout & Settings panel.
- In the Form Template: Update the Form Version field on the template's Settings tab.
Draft Actions
| Action | Steps |
|---|---|
| Access Drafts Menu | Click the Menu (⋮) under Drafts. |
| Edit Draft in Form Designer | Click the Menu next to the draft → Design. |
| Upload Media or External Lists | Click the Menu next to the draft → Upload. |
| Download Draft | Click the Menu next to the draft → Download. |
| Permanently Delete Draft | Click the Menu next to the draft → Discard. |
Version Actions
| Action | Steps |
|---|---|
| Access Versions Menu | Click the Menu (⋮) under Versions. |
| Edit Version in Form Designer | Click the Menu next to the version → Design. |
| Preview Version | Click the Menu next to the version → Preview. |
| Download Version | Click the Menu next to the version → Download. |
Fields to Display on Participant Details Page (Optional)
When a form is part of a Common Event, you can choose which fields appear in the Common Event table on the Participant Details Page (PDP).
Configure Display Fields
- Open the Form Card within the Common Event.
- Click the Fields to Display on Participant Details Page dropdown.
- Select the form items you want to display on the PDP.
Permission Tags
Use Permission Tags to control which User Roles can view or edit data from specific forms in Study Runner. Permission Tags provide flexible, form-level access control beyond role defaults.
Configure Permission Tags
To define or update Permission Tags, refer to Design a Study-Permission Tags.
Assign Permissions
To grant or modify user access for forms configured with Permission Tags, refer to User Access & Sharing.
Data Dictionary
The Data Dictionary provides detailed, form-specific metadata to help you understand each form's structure and configuration.
You can access the Data Dictionary from each Form Card in Study Designer. It includes:
- Form Metadata – Form name, version, and properties
- Item Metadata – Item OID, Item Group Name, Item Group OID, Item Type, and Insight Table mappings
Export the Data Dictionary
- Open the Form Card.
- Click the Data Dictionary link.
- Download the CSV file to view or analyze the data outside Study Designer.
Was this article helpful?
That’s Great!
Thank you for your feedback
Sorry! We couldn't be helpful
Thank you for your feedback
Feedback sent
We appreciate your effort and will try to fix the article